The Knot-Proof Way to Detangle Natural Hair and Retain Length

I’m a bit of a hippy. One of the reasons I love natural hair so much is because to me, natural hair feels closer to just being human. I like to embrace my humanness in ways that sometimes make people uncomfortable. My edges are never “laid.” I usually don’t shave my legs or wear make-up because—why deny my beautiful humanness?

For the same reason, I never used to detangle my hair. What’s wrong with a few knots here and there? Well, if you want to retain length there is a whole lot wrong with it. Our hair regularly sheds. If we leave the dead hair in with the living the dead hair tangles around itself and adjacent hairs and causes matting, knots, and breakage.

Proper detangling requires patience. If you get in there with your fingers or a wide-tooth comb and start hacking away you will damage your cuticles and create split ends.

Lets get started!

  1. When I detangle I start by braiding or twisting my hair into manageable sections. This time I was feeling especially patient and separated my hair into nine sections. Depending on how thick/long your hair is you can separate into more or less sections.

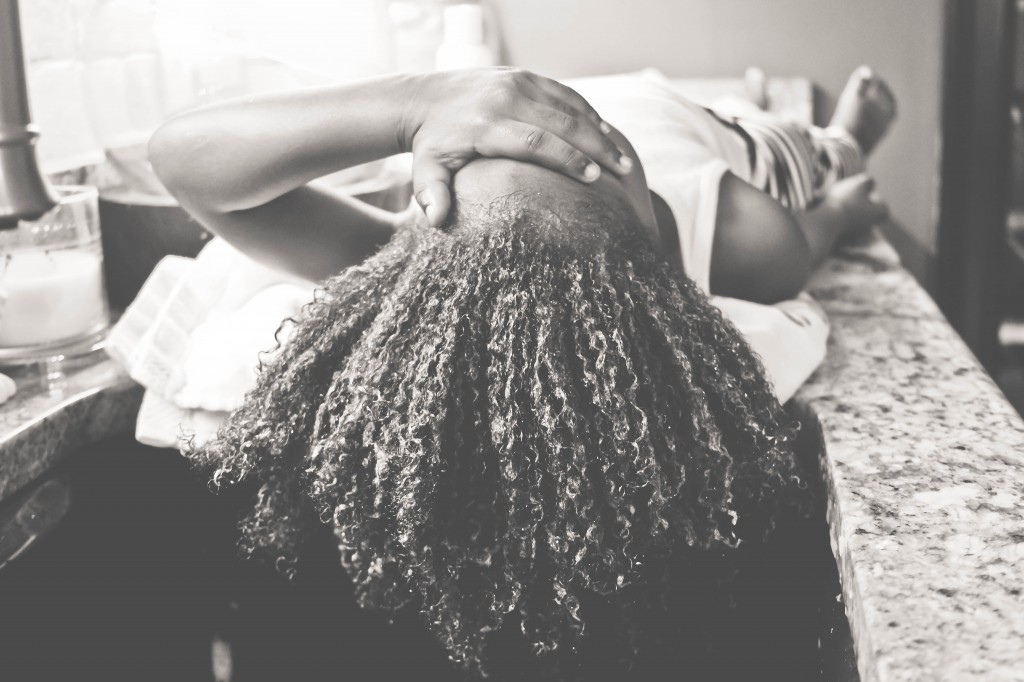
    I usually only detangle my hair in the shower during my weekly hair wash. I try not to manipulate my hair when it is dry because I find I lose more hair that way. For this how-to I will skip over the washing process and focus on my detangling method.
  2. Undo your first section. Get it wet with either a spray bottle or in the shower. Put conditioner in your hair from base to tip. I use the Saje organic conditioner—find a store near you here. Cover your strands in conditioner. This nourishes your hair and gives it slip to encourage the loosening of knots.
  3. Use your fingers like a comb to detangle hair from root to tip. Yep, that’s right—All I use to detangle are my fingers. I used to swear by the wide-toothed comb, but my stylist made me promise to never put a comb to my head again.Even wide-tooth combs cause excess breakage for my hair and stunt growth because the wide-tooth comb can’t feel my knots. Only I can. Detangling tools are not connected to a brain and therefore do not know when to let up and try separating in a different way. We have not yet invented a tool that can adjust the amount of pull depending on the strand of hair. But my fingers can, and they work, so I use them.
    Start separating your hair and GENTLY remove all the knots. Be sure to wash off shed hair from your fingers as you go. This is to ensure you are not putting the shed hair back into your living hair to create tangles and breakage.Continue combing fingers through your hair until there are no knots and your fingers come out clean (without shed hairs) when you run your fingers through your hair.
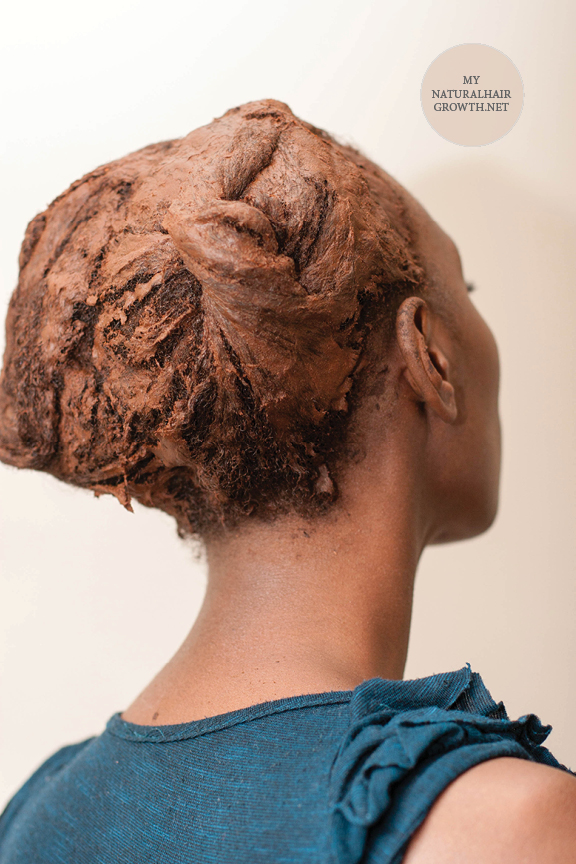
  4. To add more slip, I will often spread some of my oil mixture on my hair to make detangling that much easier. In my oil mixture I put
    • Almond Oil (Reduces inflammation of hair follicles)
    • Olive Oil (For moisture)
    • Avocado Oil (Improves blood flow in scalp to promote growth)
    • Vitamin E (Antioxidant)
    • Jojoba Oil (Coats and protects hair)
    • Castor Oil (For nourishment)
  5. Braid/twist your hair back up so that it cannot knot again.
  6. Start the process from the beginning with your second section.
  7. When you have finished detangling and retwisting/rebraiding each of your sections, feel free to wash outI’ve said it once and I will continue to say it: every person’s hair is different. This is my favourite way to detangle my hair. It doesn’t hurt and I find I lose the least hair this way. HOWEVER if this method is not giving you good results and you find that you’re losing even more hair, stop doing it this way and try something else.

Do you detangle your hair when it’s wet or dry? Do you use any tools other than your fingers?

9 Essential Steps for Maintaining Braids or Twists

Picture this: You wake up, get out of bed, and head to the kitchen to make yourself some breakfast. On your way to the fridge you glance out the window and…snow. You roll your eyes in slight annoyance. Time to protective style.

Whether you are protecting your hair from the ever-changing Canadian climate, tired of your twist-outs, frustrated with transitioning, or if you just want to change it up – protective styling is a great way to protect your hair and make it lower maintenance.

The BIGGEST mistake women make when protective styling is braiding their hair up and ignoring it for two months. If your hair is in braids make sure you follow these 9 essential maintenance guidelines. You’ll thank me when you unravel your braids and your hair is healthy, strong, and long.

1. Protect Your Hair At Night

Many black women were taught since we were young that tying our hair up at night is just good practice. So we tie our hair when it is out or when we want to keep our weave looking fresh – but when we’re wearing braids we throw all of that good practice out the window. Covering your head with a satin headscarf at night not only keeps your edges looking fresh it also protects your roots from drying out when you sleep. If you find satin headscarves uncomfortable then place a satin pillowcase over your pillow for a similar type of protection. If you are really a keener – do both. Wrap your head and invest in a satin pillowcase. If your headscarf comes off in the night you still have the protection of your satin pillowcase. I had a stylist who could tell when I had skipped a few days of wearing my satin headscarf. She would take one look at my scalp and scold, “Your head is dry! What did you do?!”

2. Keep Your Scalp Moist

This is one thing I need to get better at. Sometimes I think I’m too busy to get out my spray bottle and spray my hair. That is definitely not true. Giving your roots a quick spritz should take you no longer than a few minutes – 5 minutes maximum. Our hair is no different than any other living thing. It needs moisture to survive – and the best type of moisture is water. Our roots get thirsty and they need watering. Our roots do not need heavy gels and oils – those clog our pores and make it more difficult for our roots to absorb moisture. Our roots need plain old water to thrive and survive.

3. Apply moisturizing and sealing product to hair

Make a point of applying your favorite sealing product to your roots at least once a week. I usually apply a mixture of Naptural85’s homemade shea butter and my Blended Beauty Curl Styling Butter. The shea butter mix sooths my scalp, protects from hard UV rays, and seals in moisture. The styling butter gives added moisture, controls the frizzing of my braids and nourishes my hair with essential vitamins and minerals.

First I spray my whole head with water. Then I put a glob of both of these products into the middle of my palm and mix it around with my finger. Then I smooth it onto my roots – section by section. This process ends up taking me around 40 minutes if I am really diligent about getting at every braid.

4. Avoid unnatural products when keeping hair moisturized

Stylists warn against using anything other than naturally derived oils to keep your roots moisturized while your hair is in braids. The most important ingredients to avoid are mineral oils. Please note that these are the key ingredients in most popular braid moisturizers. Instead, opt for natural oils similar to the ones I just mentioned earlier like coconut oil and almond oil. These oils are great for soothing the scalp and retaining moisture without building up and clogging your pores like generic braid sprays often will. If you are looking for non-greasy moisture use a natural leave-in conditioner instead.

5. Wash your braids once every two weeks (minimum)

I know this sounds like a pain but buildup of sweat, dirt, and everything else that happens throughout your day can be damaging to your hair. Thankfully, you don’t need to hop in the shower and douse your braids in water if you don’t want to. You can always dry-wash your hair with a cloth, shampoo, and some water. Dampen a wash cloth with warm water and your shampoo of choice. Part you hair and wipe your scalp down in sections. That’s all! Follow this process once every two weeks to keep your scalp smelling and feeling fresh. No one likes braid stank.

6. Avoid constant up-dos

I love updos. Twisting, braiding, and tying my hair atop my head are ways for me to experiment with my look. However, constantly styling your hair into high ponytails pulls at your hairline. This constant pulling weakens the hair along your hairline and you end up looking kinda like Naomi Campbell. Be gentle with your hairline. Rock your updos – but try to limit updo styling to 3 or 4 times a week rather than every day.

7. Don’t pull too tightly when styling

For the same reason as #6. No one needs a Naomi Campbell situation happening up here in Canada.

8. Extend your style time – Redo your edges

Often, after a couple weeks your roots have grown out and it’s time to freshen up your look. Rather than rebraid your entire head – go back to your stylist and ask her to spend an hour or so re-installing the braids along your hairline. After you take out the braids along your edges, (and before you head to your stylist) take extra care to detangle and deep condition before reinstalling your braids again. Remember that your edges are already fragile, so they need a little bit of extra care and attention.

9. Don’t leave your braids in for too long

During one of our BHS Street interviews we met a woman who shared a horror story with us. On one occasion she had gotten braids and left them in for 3 years. 3 YEARS. When she removed the braids her hair came with it. She was left with bald spots all over her head. Now, I’m hoping none of you would make this devastating mistake. But sometime we get lazy and decide – hey four months in the same protective style can’t be that bad right? WRONG. Protective styling is meant to be short-term temporary. Stylists recommend protective styling for a month at a time – 2 months maximum. Any longer than that and your new growth will stretch and damage; this completely negates the point of protective styling. Protective styling is to give your fragile ends a break and focus on attaining new growth.

(Photo credit: Emily Oud Photography)

Rebecca’s Journey to Acceptance

My journey with my hair has been a long one. As I think it is with many young African children. To me, the “black hair” struggle began the minute I was old enough to have my beloved momma twist my hair into braids and curls. I recall growing up around girls with light skin and pin straight blonde hair. Man, was I jealous.

All I wanted was to be able to tuck straight strands behind my ears like every other little girl. A good friend and I laughed just a week ago about the “T-Shirt-Wig phenomena.” The one where you pull a shirt over your head, the collar like a crown, and the sleeves tucked, just so, behind your ears.

I may be generalizing, but I feel like every little girl with curly hair has done it. The minute I figured out how to use a flat-iron its usage became an instantaneous habit. That’s when it all began. You see my hair was like a mop when straight. Thick and full with no particular direction of where it was supposed to lie. From the eighth to the ninth grade that changed dramatically. My chronically straightened hair thinned out substantially, which at the time I thought was fantastic.

The thinning made it easier to style on a daily basis, and it looked more like the girls who had naturally straight hair, but by 20, it was too thin, and broken, and I had to make a change. I decided to straighten my hair rarely – if ever. When I look back at my hair journey it is saddening and speaks to a much larger story than just strands of protein hanging from my scalp.

Growing up, you don’t want to be the different one. Being half Ethiopian and growing up with less than 10 African students in my school, I felt like I looked different. In junior high school different wasn’t pretty, and I wanted to look pretty. It has been over a year now since I decided to embrace my curls.

With that choice came more interest in my culture and what it means to me. I am lucky to be born with curly locks, but I only discovered how lucky I am after I learned how to truly accept myself.

Why accept myself? Why now?

I work for a children’s charity that serves sick children and there is one little girl that enlightened me on this question. She is seven years old, and battling chronic leukemia. Her mother told me the story of her diagnoses and how after their first experience in the pediatric enology ward her little girl began to ask questions about the children with no hair.

You see, this little girl always had her hair pulled back in the most adorable little braids, curls and twists. However, once she realized that this sickness – HER sickness – had stolen the other children’s hair, she was determined to show the sickness that her hair belonged to her. The sickness wasn’t allowed to steal it. She owned her hair, and no one was allowed to take it away from her.

From that moment on, the little girl wouldn’t let her momma do anything but brush her hair. No pig-tails, no braids, no curls, just wild, wavy and beautiful locks. As I look back at my childhood, my hair was always pulled back, in braids and curls. These styles were lovely, but they never taught me to appreciate my hair in it’s natural, wild, wavy and beautiful form.

Growing up from a child to a teenager, I always remember feeling foolish when my hair was loose and natural. I hated swimming because I’d have to flat iron it the minute I got home. Heaven forbid it rained because then I felt what can only be described as shame for my horrid frizz.

There is tremendous value in teaching young little African girls that their beautiful black hair, is just that, it is beautiful. I rarely straighten my hair, once in the last 9 months in fact, and I don’t think I’ll be changing my curly ways any time soon.

Teach young little African girls that their beautiful black hair, is just that,beautiful

Teach young little African girls that their beautiful black hair, is just that, beautiful Click To Tweet

What do you think. Have you embraced your curls? If so, how?

Why Finger Detangle Natural Hair?

When I was first told that finger detangling can be the healthiest and most organic way to get through the knots in my coil-prone and thick head of hair I was skeptical. I could not let go of the love/hate relationship with my ruthless hairbrush that got me through so many hard times–I mean my right arm is unnaturally stronger than my left kind of hard times. After some light research and from personal experience here are some of my thoughts on finger detangling.

On the Topic of Time:

Every new hair or skin regimen is going to have some positives and negatives. There is always the grief and discomfort that comes with trying something new and unfamiliar but then, if we are lucky, there are often success stories that come from these unfamiliar experiences.

When I first started using my fingers to break apart the knots and locks from my hair the frustrating part was the amount of time and meticulous effort needed to execute the task successfully. As much as you’d like to believe you might be able to catch up on some of your shows during this time, it just isn’t so in the starting stages of finger detangling.

After finger detangling for about a year now my hands have become accustomed to feeling out the knots and pulling them apart. Although you might be able to detangle your hair without a mirror fairly quickly, detangling safely still requires a lot of concentration on your hair and hands to be done properly. The reason I caution you with this is because even though the hand is a much gentler tool than the comb or brush to our curls, breakage is still possible. Reason being we get impatient and inconsistent with knots, and sometimes it’s just easier to tear them right out instead of coaxing them to come apart. Multitasking can sometimes distract from the ability to nurture these kinks.

My biggest tip to overcoming the time is playing some good music. Preferably, some oldies you just can’t get tired of so your mind isn’t too focused on the new beat/lyrics but just something to jam to while your hair occupies you. Also, although it might be tedious to sit, or stand in front of a mirror, it helps. When you can see yourself detangling it not only makes the job faster and more efficient but the aesthetic of the act feels the same as watching a screen might. Watching the task get done is a lot more gratifying and does not feel as time consuming. But, of course, the best part will always be the end. Even after a year of practicing finger detangling running my fingers through it from roots to ends, and yet still feeling that the coils and curls intact, is incredibly satisfying.

More Curly Less Puffy:

Finger detangling gives more depth and thickness to the hair and you get a lot more curl definition. Because my curl pattern is a mix of 3B, and 3C hair there is a large difference in texture and size when I use my fingers to pull apart knots than when I use a brush. The reason being that the hair can retain more moisture when the curls that do not have knots are saved from being thrown under the bristles of the brush and separated.

Brushing your hair allows oxygen to get in between your hair follicles and causes frizz. Also finger detangling needs a more careful application of oils or lotion (depending on what you prefer) in order to gently pull apart the tangles. This added and careful application of moisturizing agents is both healthier for the scalp and ends. Brushes and combs are not too forgiving in terms of bend or softness. What this does is scratch at your very vulnerable scalp, which can lead to dandruff and split ends. This adds more to the puff aspect of your hair than the curl.

With regards to dandruff; both the curlier and thicker your hair is the lack of natural oils that your head of hair has available. Not only do we need the extra application of moisturizer but also we owe it to our scalp not to be scratching and tearing at it with the teeth of a comb or brush. Since practicing finger detangling I’ve completely eradicated the issue of dandruff, even after testing with a comb to make sure I don’t miss any knots, no more flakes show up in my hair or on my comb.

In conclusion, for most mixed hair types, curl definition makes a huge difference in the way you’d like to style or wear your hair. Apply oil to your hair while finger detangling to make the process less painful.

More Manageable:

I’ve noticed that after spending so much focused time with my hands in my hair, the rest of the week my hair is a lot more manageable. My hair is a lot more lenient to be styled. It could be that my hair is used to the feeling of being pushed and prodded by my hands or that my hands have become more attuned to the nature of my hair and the ways that it will and will not yield to styles. Either way, the styling process is so much easier without the use of the middleman brush that disconnects you and your hair, from understanding what can and can’t happen.

It could also be the added precision to the process of moisturizing and well oiling my hair and scalp that has made the hair a lot stronger. All in all there isn’t a single step in the process of finger detangling that would not be beneficial to the management and strength of curlier hair. If you’re unfamiliar with the steps of finger detangling you can find a step-by-step run down in the article “Detangle Natural Hair” by Reakash!

One of the most beneficial outcomes of finger detangling has been connecting with my hair a lot more intimately than is possible with the use of a brush. Running my fingers through my hair in the morning allows me to pin point the exact spots that are a little dry and maybe others that aren’t. Sectioning my hair off before a wash and using oil to carefully sift through the lot of it has made me more aware of the type of hair I have and where. If time or strength is an issue and finger detangling on the regular or, god forbid, ridding yourself of combs and brushes does not sound appealing, I would like to ask you to at least attempt it and once you have, attempt it again. I say that because your second time will be more successful than your first – of that I’m certain.

The reason I am so keen on every black woman attempting finger detangling is because I can say with confidence that the fine toothed comb and brush are not tools that were designed for our hair types. Also so that every woman can experience the feeling of getting know your hair without the use of man-made tools that can often distract us from our roots. Pun intended.

The fine toothed comb and brush are not tools that were designed for our natural hair types #bhs Click To Tweet

I would love to hear about some success and/or failure “First Time” tales on the experience of finger detangling. Whether it was done to you or you attempted it for the first time on your own, share below!

Expert Opinion: The Risks and Benefits of Henna

“Asha MacLeod is an award winning stylist and owner of Toronto’s Jazma Hair Salon

Henna is actually not a hair dye it only stains the hair. Henna has been around for over 5,000 years and originated in Egypt and the Middle East. Red henna is the original “true” henna.

Henna has been used on hair for as long as I can remember. It gives you a nice stain as long as you are ready to commit to the color.

Henna is excellent for oily hair because it has a drying effect. It coats the hair similarly to how protein filler would. Henna is great for volumizing and giving body to fine hair and drying out excess oil in oily hair.

Certain hair types react differently to Henna. Just because henna is natural doesn’t mean that it cannot harm your hair if used inappropriately. Let’s refer to hair according to Andre Walker’s hair typing chart. For curls types 2-3 it is safe to henna stain your hair fairly often. Hair in this category is often slippery and oily and benefits from the drying properties of henna.

As the hair types become more coily, it is important to lessen your exposure to henna staining. Coily hair types in category 4 need to be cognizant of the fact that henna will dry out your hair. I recommend applying henna no more than twice a year. When you do, be sure to use lots of water-based shampoos, conditioners, and moisturizers to balance the drying effect of the henna.

Remember: Henna is permanent

Before you impulse dye – make sure you want the colour. Know that even though henna is technically a stain, it is fairly permanent. Depending on how porous or dry your hair is henna can remain on your hair forever. So make sure that you want it.

The longer you leave henna in, the better the stain, and the more it will dry out your hair. I would recommend that women with type 4 hair stay away from henna completely. There are other options for staining that are more lubricating.


Remember: Henna is permanent. Before you impulse dye - make sure you want the colour. #bhs Click To Tweet

Have you used Henna in your hair?

Expert Opinion: The Best Way To Cut Curly Hair

“Buster Berkely is a stylist and owner of Toronto’s Amorphous Salon

At Amorphous, we prefer to use the phrase “Shaping Hair” as opposed to “Cutting Hair”.

Our concept is that hair is shaped and not cut. Wet cutting has been the norm for years. I work with many different hair textures and have found after years of cutting curly hair both wet and dry, that better results are achieved when I cut curly hair dry. After consulting with the client we look at the texture, density, growth pattern and the curl pattern of the hair. We then discuss the desired style with the client and decide which style is best suited.

Often when clients come into the shop their hair is clean enough to style. We lightly straighten the hair shaft using a blow dryer. We make sure the hair is pliable and easy to control for making sections.

When we shape our clients’ hair we work around the head in a circular manner working with the balance points of the head. We then layer the hair using various degrees and elevations and seeing exactly how the hair is falls – dry. We then add texture to the shape by either removing volume by shaping the interior of the hair to remove bulk or by texturing the ends to spiral and intertwine with each other.

We finish up with alpha, beta, or gama blades. We try to ensure the client is left with a style that is easy to work with and stylish.

I love shaping curly hair dry. It brings me joy to see the shape falling in place while I work.

We look at the texture, density, growth pattern and the curl pattern of the hair #bhs Click To Tweet

Have you had your hair cut when dry?

Elements of any good weave: Hair Weave Types

With my grade nine grad around the corner, I remember begging my mother for long lush locks. My first weave was long, thick and strawberry blonde. I absolutely loved it, back then anyways. I look at the pictures of that day now and all I think is I wish I knew then what I now know about hair. At the time my knowledge about the vast variety of hair was minimal, maybe non-existent.

When I walked into Images and Shades for the first time I was slightly overwhelmed by all the hair options in front of me. I remember the teller asking me what I was looking for. My reply was long hair, blonde in colour. She continued with her questions: how many inches long are you looking for? Would you rather #22, #24, #27…? I was completely confused. She spent some time explaining the various lengths and guiding me through a colour chart. She then explained what I now believe to be the most important aspect of any good weave, the type of hair. By type I’m referring to synthetic, human or remy hair. The reality of how clueless I was set it. She quickly pointed out and explained the differences between synthetic and human hair. I opted for the synthetic only because I was on a strict budget and I wasn’t planning on doing much to my weave as far as styling was concerned. Although my weave didn’t turn out badly, it could have been better by simply improving the quality of hair.

Ladies if you’re looking to avoid a bad weave situation, you need to have a good idea of what you want to do with your weave where styling and maintenance are concerned. How good your weave looks is absolutely determined by the quality of the hair installed. As I mentioned earlier there are three basic types of hair, synthetic, human and remy. But what exactly is the difference between them? That’s what I aim to explain with this next part. Here’s a brief description of each type and what I suggest would work best for certain looks/styles. This also applies to wigs; the hair used to make wigs is the same, they’re just an alternative installation method.

Synthetic

Synthetic hair is a great choice if you’re looking for a new look to last you a short time. Synthetic hair costs anywhere between $15.00- $90.00 depending on the brand and style. Synthetic hair is the most affordable type of hair on the market — ideal for anyone who wants a change without having to break the bank. This type of hair is usually already styled at the time of purchase which eliminates the styling process, saving you money as well as time.

With that said, although synthetic hair is convenient and cost effective, it does have its limits when it comes to being versatile. Synthetic hair is made to look like human hair constructed from thin manufactured hair fibers; therefore, it is not heat resistant to the extent that human hair is. You will not have the ability to curl or straighten this type of hair nor will you be able to dye the hair. There is synthetic hair available that you can apply very minimal heat to but you still won’t get the styling results that you would with other hair types. I personally wouldn’t apply any heat to synthetic hair because of the fear I would have of burning or damaging it.

If you’re considering getting a weave for first time synthetic might be the way to go. You can figure out what you like and decide if you even like having a weave installed, before you fork out the cash for hair of a higher quality.

Human

100% human hair has an elevated natural appearance to it in comparison to synthetic hair. Human hair is great because it replicates natural hair almost perfectly and can last you a few months (approx 6-8 months) with multiple installs, depending on how well you care for it. It will also offer you the versatility that synthetic hair lacks. Human hair gives you the free range to style your weave exactly the way you want. Whether it’s curled or straightened it will withstand the heat applied to it and just like natural hair you have the ability to dye it if you choose to.

However, like anything else, human hair does have its pitfalls. It is a bit more expensive than synthetic hair, running anywhere from approx $50.00-$150.00, again depending on the brand and length. But remember that you are getting higher quality hair. Human hair also has a tendency to tangle and shed; this is because the cuticles are not all facing the same way. Also, human hair is often put through some processing to improve its appearance.

Remy

The hair of all hair types, remy is nothing less than amazing! Sharing similar qualities to that of human hair, remy hair is versatile and natural and undergoes minimal processing. If cared for properly remy hair will maintain its natural movement and appearance from 6 months to over a year. It is also heat resident so applying various styles and dyes will not be an issue. Remy hair comes in various styles such as straight, curly and wavy; it will also return to its natural state after having been styled and washed. You will notice that with remy hair there is virtually no tangling or shedding because the cuticles are kept intact and all face the same direction. When it comes to blending your natural hair, this process is made simpler with remy hair because there are various textures you can purchase. I won’t go into too much detail about them individually but this is where Indian, Brazilian, Malaysian and Chinese remy hair would come into play. That’s another topic for another article.

Some of you may be wondering what the difference is between remy and virgin hair is. Although they are almost identical the biggest difference is that virgin hair is completely 100% natural and unprocessed. Virgin hair has not been processed or dyed and is only available in its natural colour. Virgin hair is always remy hair; however, remy hair may not always be virgin hair.

Source: http://brownsugarbeauti.com/beauti-101-the-difference-between-remy-and-virgin-hair-extensions

So what’s the down fall to remy hair? All this hair goodness comes with a hefty price. Remy can start from about $150.00 per bundle to over $500.00 or more. Again this is dependent on length, brand and if its virgin hair or virgin remy hair. At times, especially if you’ve never purchased hair in the past, the task of choosing the right type of hair may seem challenging. I look at it similar to a trial and error method. It’s about progression; start with the simple and cheapest. Allow yourself time to familiarize yourself with what works and doesn’t work for you and your hair.

Source: http://remigoddesshairextensions.com/index.php?main_page=index&manufacturers_id=4


Source: http://www.hairtiquebymimi.com/product/virgin-brazilian-straight/


The Bigger the Better

Source: http://urbanbushbabes.com/into-the-gloss-coralie-jouhier/

I’ve been pulling, pinning and brushing out the poof from the puff of my hair for as long as I can remember. When I was in grade school I unashamedly told my Mama that I needed her to use gel in it to hold everything down and ‘against my head.’ Mama laughed and replied, ‘Hun, who told you what gel is?’

I can’t remember if she heard my answer through her giggles but if she did she would have heard me confess that the other girls at school had mothers who used gel to keep their hair from moving.

Now, today I think that’s an unhealthy way of thinking. Hair is definitely supposed to move. I grew up struggling with the notion that hair can’t possibly look good so far away from one’s scalp. The result? The High Ponytail (where I would apply so much product to my curls they were damp and docile at all times), the Working-Woman-Bun, and of-course the classic French Braid. The thing all of these styles have in common is that none of them allowed for my hair to breathe.

Whenever my hair would stress me out to the point of tears because I couldn’t get it to all stay in place, which was often, my Mother was always quick to remind me if I stressed out my hair would too. Today I translate that as: the more I oppressed my curls the more I felt oppressed. My voice became softer and my body language reserved—not unlike how I wanted my hair to appear to others.

Listed here are a few of the reasons I decided to overcome the anxiety of letting my hair fly free, and large. This new state of mind lead to me fully owning my hair and self.

The Compliments

They say flattery will get you nowhere but with the kind words of sweet strangers, admirers and friends I quickly came to realize that no one was offended by my hair. If anything people were in adoration of it and its new found freedom. They loved the way it looked and felt. Many would ask to run their hands through it. Be aware that this is both a pro and con as some days you would rather not have fingers all up in your roots.

The Feels

There aren’t many things that beat the feeling of wind whipping through your afro, or the way it can violently flip it back and forth without the beat of a head bobbing soundtrack. That feeling of dipping down to tie your shoelace and later removing strands of hair from your lip-glossed upper lip as you straighten out. That feels a lot like freedom. Especially after the days of efficiently slicking everything back with surmountable precision and accuracy.

The Simplicity

You would never expect that leaving your hair to the whims of the wind and all other environmental complications could actually make your life a lot simpler. Truth is the more unruly my curls became, and the more I accepted them in that state. The amount of time it took me to get ready dropped significantly, as well as my overall stress levels while I was out and about.

Truth is, worrying about which strands of hair might be trying to break free of their confinements all the time was taxing. It seems like an easy feat but letting go of that worry was a lot more of a struggle than letting go of my thick hair lotions and bobby pins.

I assure you that not only is bigger better, it’s fun and most of all it’s freedom; this self-imposed pressure of what our hair should look like and the restricting its natural state does no one any good. So let it go and allow them curls to grow and reach in all the directions they were meant to—whether that be obscuring someone’s view in the movie theatre or a student’s view of the instructor because that is their burden, not yours.

Today I can proudly say that I no longer own a tub of gel, or any ‘moisturizing’ thick lotions to force my curls into submission. If I had some say, I’d hope that no one ever does. Today I shower and let my curls define what kind of hair day we’re having and part of the freedom is knowing that tamed or unruly none of them are bad.


Natural Hair Essentials

One thing that I have learnt with trying to take care of my natural hair is that without my weapons of choice, I would be fighting a losing battle. I get asked a lot about my routine- most people think that it’s extremely difficult maintaining my hair. The truth is, its not too bad!

My Routine Exists in 5 Steps:

Detangling

In my experience, it’s always best to detangle my hair when dry. It causes so much less breakage, and saves me from premature split ends. Finger detangling is always the best-parting my hair in smaller sections and dealing with knots individually has really helped me with hair growth and strength. However, finger detangling is not always possible as it is time consuming and tedious.

On regular days, I try to detangle my hair when dry using a wide-toothed comb, but most days I wet my hair in the shower with lots of conditioner, part and then comb through. I’ve experimented with lots of products, but what I find provides me with the most slip (which is very necessary!) is DevaCurl One Condition and your regular ol’ Dove Daily Moisture Conditioner.

Washing

I know, I know- you’re supposed to shampoo first! My hair can be exceptionally dry – years of straightening it has stripped the moisture out of it. Shampooing my hair after detangling makes the cleaning process a lot easier. I don’t like to use very harsh shampoos, as they tend to suck my hair of all its natural oils and that’s a serious no-no!

I use DevaCurl’s Low-Poo Shampoo. It cleans my hair, and the added Rosemary and Chamomile leaves my hair feeling fresh and wholesome. I usually coat my ends with some coconut oil before shampooing to prevent them from drying out. No-poo and Low-Poo shampoo barely has any lather, so the trick is to scrub your scalp real good, rinse out, and repeat until you feel your hair is clean. Once I’ve shampooed, I go ahead and re-condition and give a quick comb through, leaving the conditioner in my hair. This helps battle frizz and dryness.

Cotton T-Shirt

It’s always best to air dry your hair, but I have found that wrapping my hair in an old cotton T-Shirt has really helped with battling frizz. Air drying hair is great for adding extra volume and unruliness, but that’s not always feasible for me (especially in the wintertime!).

When I step out of the shower, I never let a towel touch my hair – towel fibers are rough and harsh, and cause unnecessary frizz. I instantly wrap my hair in the T-Shirt and go about getting dressed. This helps absorb all the excess water from my hair, and stops me from leaving a wet trail in my wake. Cotton T-Shirts absorb water almost as fast as towels do, and in just 10-15 minutes, my hair is ready to style.

Moisturizing

Coconut oil is my go to when it comes to moisturizing my hair – I’ve tried and tested lots of different products, but I keep coming back to my trusted sidekick. I normally apply a coin-sized scoop of coconut oil in my palm (you would need more or less depending on the texture and length of your hair). I then run my palms through my hair, concentrating on my ends and center, as that’s the driest part of my hair. This helps keep my hair from drying out and matting. I do this every day until I’m due for my next wash.

Deep Treatment

The secrets out-it’s all about conditioning. I try to deep condition my hair once every 3 months, or whenever the weather changes (this tends to leave my hair exceptionally dry). I use DevaCurl Heaven in Hair deep conditioner, which is specially designed for colour treated and relaxed hair. When I have extra time, I like to do a deep conditioning treatment, mixing egg and coconut oil, applying that to my hair and leaving it in for about an hour, then thoroughly shampooing it out. This protein mask helps ease breakage and leaves my hair shiny, light and soft.

The secrets out-it’s all about conditioning. I try to deep condition my hair once every 3 months, or whenever the weather changes (this tends to leave my hair exceptionally dry).

Tackling Washday: 8 Essential Tips for Washing Black Hair

Source: juicysistas.tumblr.com “How do I love thee? Let me count the ways” -Elizabeth Barrett Browning

For all the curly-haired ladies out there, I’m sure some of you can relate to this quote on some level when it comes to the relationship you have with your hair. A good shampoo and conditioner seemed sufficient at one point: slap those onto wet hair, rinse out, and go to town, but the more time I spent caring for my hair I realized that wasn’t enough.

Often times we dedicate a whole day to the cleansing ritual of our hair. While your routine may be similar to another person’s wash routine your routine should not be identical to anyone else’s, because your hair is not identical to anyone else’s.

If you have a head full of natural hair like mine, washday can be intimidating. When reintroduced to water, tangles and knots can turn a day meant to be about pampering to one of frustration.

There are a few things to keep in mind when washing your hair:

  1. When we wash our hair we want it to be clean, but not dry. Shampooing your hair can strip it of moisture and leave you with dry hair. Avoid shampoos that contain salt, propylene glycol, and parabens.
  2. Prepare your hair for the wash. Section your hair off into four or more parts and apply your pre-poo. A “pre-poo” is an oil treatment added to hair before shampooing or conditioning. In most cases doing this before exposing your hair to potentially harsh shampoos can help provide your hair with a little extra moisture. Depending on how often you wash your hair this step may not always be necessary, but because I generally wash my hair once every two weeks I opt to do it every time.
    To do this I prefer to use extra virgin olive oil, or something I’ve mixed up; it’s generally pretty cheap and does the trick. Here are a few of the different treatments I’ve found online that can be used http://www.kissmycurls.com/my-curly-is-conditional/pre-poo-recipes/.
  3. After applying the treatment to damp hair I cover it with a plastic grocery bag or cap and leave the treatment in my hair for at least thirty minutes.
  4. Once you’ve applied your treatment of choice, start detangling your hair in the sections that you’ve created. Doing this should make managing your hair at least a little bit easier after the wash.
  5. Depending on what I’ve used as a pre-poo treatment, I’ll wash it out of my hair first with water if it’s of a heavier consistency, but if it’s a oil, I shampoo normally.
  6. Shampoo your hair. Based on how long and thick your hair is you’ll need a different amount of shampoo to work through your hair. I generally use a very small amount of shampoo to get my hair clean. When shampooing your hair work it into the sections that you made by loosening the braid or twist one at a time; focusing on that particular section and re-twisting it back up before moving on to the next.
    As you do this make sure you work on massaging the shampoo on your scalp to ensure that it becomes free of product buildup. Work the shampoo through the hair and try to elongate the strands rather than rubbing them to the scalp. This prevents tangles.
  7. To condition your hair continue using the same method. Be generous with the amount of conditioner you use, elongate the hair, work in sections, and rinse.
  8. When drying your hair squeeze out as much of the water as you can before towel drying; as much as possible, avoid rubbing your hair with your towel —especially if you’ve chosen not to braid or twist your hair in sections. This will help to prevent tangles.

I know a lot of naturals prefer to use sulfate-free shampoos, but to date I have not tried using any of these products. However, because I do use shampoos that contain sulfates I only wash my hair with shampoo once every two weeks. If I choose to wash my hair between my scheduled washdays I usually co-wash it, which is a method of cleansing the hair with conditioner.

What does your hair washing regime look like?